📕
innohub
  • KEEP LEARNING
  • WebInfo
    • JS 部分运算符操作
    • javascript 中的object array
    • 错误处理以及异常捕获
    • JavaScript Bases
    • LaoZi & Confucius
  • PyInfo
    • Python3 输入与输出
    • Python3OS
    • python 修饰器的使用
    • python3 与mysql数据库连接使用实例
    • Format-specifier
    • CGI初学踩坑
    • Django 项目测试
    • Assert-info
    • 使用ngnix和uWSGI配置Django
    • write|SVN​
    • Matplotlib 基本使用
    • 重读 Python 官方文档
    • Python3 Base
    • python3 多线程
    • Python3 函数解析
    • python3 str 对象的基本操作
    • protocl buffers
    • Iterator-Generator
    • Django base
    • Decorator 2
    • Export to wheel or egg-info
    • 三. 运算、数据及逻辑
  • GoInfo
    • Info
      • Select 语句使用
      • First class function
      • Work Pools
      • StructTag
      • Go struct
      • 常用函数
      • Strings操作
      • Golang Bases
      • 数组以及切片
      • 文件操作
      • Golang 中的指针类型
      • Golang Map 类型
      • Reflection
      • 函数闭包
      • 接口
      • Panic and Recover
      • Go中的错误处理
      • 并发
      • defer usage
      • Method in golang
      • Object-oriented Programming
      • Goalng 包管理机制
  • RustInfo
    • Info
      • 包、crate、模块
      • Rust 中的错误处理
      • 智能指针
      • 泛型 generics
      • 数据布局与内存对齐
      • Functions and methods
      • 无畏并发
      • Actix-web 基本使用
      • Got from guessing game
      • 结构体的使用
      • Rust 中的函数式语言功能
      • 集合类型
      • 枚举以及模式匹配
      • Slice 类型
      • 生命周期
      • 测试
      • Rust 中的所有权
      • trait
      • 不安全 Rust
      • Format_print
      • Rust 通用编程概念
      • Macro
  • OS
    • info
      • 内存屏障 -- Part 1
      • 内存屏障 -- Part 2
      • CPU 上下文切换
      • 文件读写与零拷贝
      • ELF 文件
  • MySql
    • info
      • MySql 架构与历史
      • 02-key
  • kubernetes
    • 第二章 k8s 基本概念
    • 第一章 Kubernetes -- 伟大舵手
  • Redis
    • info
      • Redis 总览
      • 02-underline-ds
  • Shell&CInfo
    • GCC 与make的使用
    • C++ 中 malloc 与 new
    • 位运算符操作
    • Base of C macro
    • C 语言中 extern 关键字的用法
  • Distributed
    • info
      • 分布式理论概述
  • Java
    • info
      • Java 内存模型
  • Prometheus
    • Prometheus -- 不灭之火
Powered by GitBook
On this page
  • 简介
  • _thread 模块
  • threading 模块
  • 线程同步

Was this helpful?

  1. PyInfo

python3 多线程

简介

多线程类似于同时执行多个不同程序,多线程运行有如下优点:

  • 使用线程可以把占据长时间的程序中的任务放到后台去处理。

  • 用户界面可以更加吸引人,这样比如用户点击了一个按钮去触发某些事件的处理,可以弹出一个进度条来显示处理的进度

  • 程序的运行速度可能加快

  • 在一些等待的任务实现上如用户输入、文件读写和网络收发数据等,线程就比较有用了。在这种情况下我们可以释放一些珍贵的资源如内存占用等等。

线程在执行过程中与进程还是有区别的。每个独立的线程有一个程序运行的入口、顺序执行序列和程序的出口。但是线程不能够独立执行,必须依存在应用程序中,由应用程序提供多个线程执行控制。

每个线程都有他自己的一组CPU寄存器,称为线程的上下文,该上下文反映了线程上次运行该线程的CPU寄存器的状态。

指令指针和堆栈指针寄存器是线程上下文中两个最重要的寄存器,线程总是在进程得到上下文中运行的,这些地址都用于标志拥有线程的进程地址空间中的内存。

  • 线程可以被抢占(中断)。

  • 在其他线程正在运行时,线程可以暂时搁置(也称为睡眠) -- 这就是线程的退让。

线程可以分为:

  • 内核线程:由操作系统内核创建和撤销。

  • 用户线程:不需要内核支持而在用户程序中实现的线程。

Python3 线程中常用的两个模块为:

  • _thread

  • threading(推荐使用)

thread 模块已被废弃。用户可以使用 threading 模块代替。所以,在 Python3 中不能再使用"thread" 模块。为了兼容性,Python3 将 thread 重命名为 "_thread"。

_thread 模块

_thread模块提供了一个低级别的,原始的线程以及一个简单的锁,可以通过以下方式产生一个新进程

_thread.start_new_thread(function, arg[, kwagrs] )

参数:

  • function : 线程函数

  • args : 传递给线程函数的参数,必须为tuple类型

  • kwargs : 可选参数

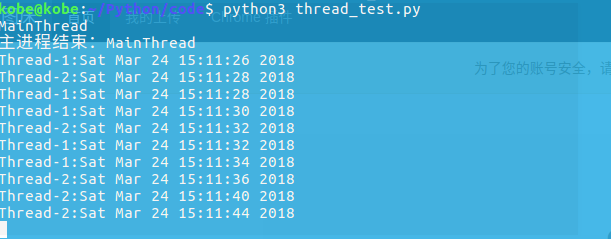
#    在python多线程中,当一个进程启动后默认产生一个主线程
#    产生其他线程时,默认是不设置守护的,即 thread.setDaemon(False)
#    主线程执行完毕后即可退出,子线程会继续执行自己的任务
#!/usr/bin/python3

import _thread
import time

def fun(threadName, delay):
    for i in range(5):
        time.sleep(delay)
        print('%s:%s' % (threadName, time.ctime(time.time())))


if __name__ == '__main__':

    print(threading.current_thread().name)
    try:
        _thread.start_new_thread(fun, ('Thread-1', 2))
        _thread.start_new_thread(fun, ('Thread-2', 4))
    except Exception as e:
        print(repr(e))

    print('主进程结束:%s' % threading.current_thread().name)
    while 1:
        pass

设置线程守护:

#     使用setDaemon(True)时,子线程为守护线程时,主线程一旦执行完毕
#    子线程立即被杀死

import threading
import time

exitFlag = 0
class myThread(threading.Thread):
    def __init__(self, id, name, counter):
        threading.Thread.__init__(self)    #调用父类方法
        self.id = id
        self.name = name
        self.counter = counter

    def run(self):
        print('开始进程:', self.name)
        print_time(self.name, self.counter, 5)
        print('退出进程:', self.name)


def print_time(threadName, delay, counter):
        for i in range(counter):
            if exitFlag:
                threadName.exit()
            time.sleep(delay)
            print('%s:%s' % (threadName, time.ctime(time.time())))

if __name__ == '__main__':
    print ("退出主线程")    print(threading.current_thread().name)
    # 创建新线程
    thread1 = myThread(1, "Thread-1", 1)
    thread2 = myThread(2, "Thread-2", 2)
    thread1.setDaemon(True)
    thread2.setDaemon(True)
    # 开启新线程
    thread1.start()
    thread2.start()
    #thread1.join()
    #thread2.join()
    print ("退出主线程")

运行结果:

MainThread
开始进程: Thread-1
开始进程: Thread-2
退出主线程

使用join方法:

#!/usr/bin/python3

import _thread
import threading
import time

def fun(threadName, delay):
    for i in range(5):
        time.sleep(delay)
        print('%s:%s' % (threadName, time.ctime(time.time())))

exitFlag = 0
class myThread(threading.Thread):
    def __init__(self, id, name, counter):
        threading.Thread.__init__(self)    #调用父类方法
        self.id = id
        self.name = name
        self.counter = counter

    def run(self):
        print('开始进程:', self.name)
        print_time(self.name, self.counter, 5)
        print('退出进程:', self.name)


def print_time(threadName, delay, counter):
        for i in range(counter):
            if exitFlag:
                threadName.exit()
            time.sleep(delay)
            print('%s:%s' % (threadName, time.ctime(time.time())))


if __name__ == '__main__':

    print(threading.current_thread().name)
    # 创建新线程
    thread1 = myThread(1, "Thread-1", 1)
    thread2 = myThread(2, "Thread-2", 2)
    thread1.setDaemon(True)
    thread2.setDaemon(True)
    # 开启新线程
    thread1.start()
    thread2.start()
    thread1.join()
    thread2.join()
    print ("退出主线程")

运行结果:

MainThread
开始进程: Thread-1
开始进程: Thread-2
Thread-1:Sat Mar 24 15:36:19 2018
Thread-2:Sat Mar 24 15:36:20 2018
Thread-1:Sat Mar 24 15:36:20 2018
Thread-1:Sat Mar 24 15:36:21 2018
Thread-2:Sat Mar 24 15:36:22 2018
Thread-1:Sat Mar 24 15:36:22 2018
Thread-1:Sat Mar 24 15:36:23 2018
退出进程: Thread-1
Thread-2:Sat Mar 24 15:36:24 2018
Thread-2:Sat Mar 24 15:36:26 2018
Thread-2:Sat Mar 24 15:36:28 2018
退出进程: Thread-2
退出主线程

threading 模块

threading 模块除了包含 _thread 模块中的所有方法外,还提供的其他方法:

  • threading.currentThread(): 返回当前的线程变量。

  • threading.enumerate(): 返回一个包含正在运行的线程的list。正在运行指线程启动后、结束前,不包括启动前和终止后的线程。

  • threading.activeCount(): 返回正在运行的线程数量,与len(threading.enumerate())有相同的结果。

除了使用方法外,线程模块同样提供了Thread类来处理线程,Thread类提供了以下方法:

  • run(): 用以表示线程活动的方法。

  • start():

    启动线程活动。

    ​

  • join([time]): 等待至线程中止。这阻塞调用线程直至线程的join() 方法被调用中止-正常退出或者抛出未处理的异常-或者是可选的超时发生。

  • isAlive(): 返回线程是否活动的。

  • getName(): 返回线程名。

  • setName(): 设置线程名。

    ​

线程同步

如果多个线程共同对某个数据修改,则可能出现不可预料的结果,为了保证数据的正确性,需要对多个线程进行同步。

使用 Thread 对象的 Lock 和 Rlock 可以实现简单的线程同步,这两个对象都有 acquire 方法和 release 方法,对于那些需要每次只允许一个线程操作的数据,可以将其操作放到 acquire 和 release 方法之间。如下:

多线程的优势在于可以同时运行多个任务(至少感觉起来是这样)。但是当线程需要共享数据时,可能存在数据不同步的问题。

考虑这样一种情况:一个列表里所有元素都是0,线程"set"从后向前把所有元素改成1,而线程"print"负责从前往后读取列表并打印。

那么,可能线程"set"开始改的时候,线程"print"便来打印列表了,输出就成了一半0一半1,这就是数据的不同步。为了避免这种情况,引入了锁的概念。

锁有两种状态——锁定和未锁定。每当一个线程比如"set"要访问共享数据时,必须先获得锁定;如果已经有别的线程比如"print"获得锁定了,那么就让线程"set"暂停,也就是同步阻塞;等到线程"print"访问完毕,释放锁以后,再让线程"set"继续。

经过这样的处理,打印列表时要么全部输出0,要么全部输出1,不会再出现一半0一半1的尴尬场面。

实例:

#!/usr/bin/python3

import threading
import time

class myThread (threading.Thread):
    def __init__(self, threadID, name, counter):
        threading.Thread.__init__(self)
        self.threadID = threadID
        self.name = name
        self.counter = counter
    def run(self):
        print ("开启线程: " + self.name)
        # 获取锁,用于线程同步
        threadLock.acquire()
        print_time(self.name, self.counter, 3)
        # 释放锁,开启下一个线程
        threadLock.release()

def print_time(threadName, delay, counter):
    while counter:
        time.sleep(delay)
        print ("%s: %s" % (threadName, time.ctime(time.time())))
        counter -= 1

threadLock = threading.Lock()
threads = []

# 创建新线程
thread1 = myThread(1, "Thread-1", 1)
thread2 = myThread(2, "Thread-2", 2)

# 开启新线程
thread1.start()
thread2.start()

# 添加线程到线程列表
threads.append(thread1)
threads.append(thread2)

# 等待所有线程完成
for t in threads:
    t.join()
print ("退出主线程")

执行以上程序,输出结果为:

开启线程: Thread-1
开启线程: Thread-2
Thread-1: Wed Apr  6 11:52:57 2016
Thread-1: Wed Apr  6 11:52:58 2016
Thread-1: Wed Apr  6 11:52:59 2016
Thread-2: Wed Apr  6 11:53:01 2016
Thread-2: Wed Apr  6 11:53:03 2016
Thread-2: Wed Apr  6 11:53:05 2016
退出主线程
PreviousPython3 BaseNextPython3 函数解析

Last updated 5 years ago

Was this helpful?

result